

Color Blocking
One of the reasons I bought this house was the flex space in the basement that I could use for my son’s playroom. As you can see from the Before photo, there was nothing playful about this room when I started. An overgrown shrub outside the window blocked most of the natural light, and the walls were painted a dull gray. The dingy carpet, dated (and very dirty) ceiling fan and surround sound speakers all had to go. I painted the walls a fresh, bright, white and replaced the carpet with the same LVP white oak flooring I installed in the rest of the house. That gave me a clean slate to work from.

I knew I wanted to keep the room light and bright and use bold pops of color to keep it playful, so I purchased the blue sofa and orange locker TV credenza. And that’s where the room stayed for several months after we moved in. When I finally got around to finishing this room, I decided to add those bold pops of color to the walls using color blocking.

I selected four colors to use, pulling the blue and orange from the existing furniture pieces, and adding yellow and green. I knew I wanted to do something on the TV and couch walls and decided to run a continuous stripe of green around the room to tie everything together. I decided how thick I wanted the stripe to be and where on the wall I wanted to place it. Then I used my 4’ level to draw level lines for the top and bottom of the stripe all around the room. Once the lines were up, I taped them off with painter’s tape.

One lesson I’ve learned through my painting experience is that paint WILL bleed under painter’s tape no matter how good you seal it. To avoid hours of touch-ups, I used the white background wall color to seal the edges, rolling over the tape lines and letting it dry before using my green paint. I applied two coats of paint and then pulled the tape. It worked great! Only one touch-up in the corner where I didn’t seal the edge well enough with the white.

Once the stripe was up, I started playing around with the other shapes I would use to add the other colors. I used my painters tape to roughly mark out the shapes, sizes, and placement and adjust and readjust as needed until I was happy with the composition. Then I used my pencil to mark the inside edges of the shapes and drew the outlines of them using my 4’ level and taped them off. I also sealed the seams with the background paint color, like I did with the stripe. But this time, I also had to use the green paint anywhere the new shapes met up with or overlapped the green stripe.

This is after two coats of paint. I utlimately used six coats to cover the green as best as I could.
Next, I started applying the color paint. If you’re painting any areas over another color and using bold colors like I was, DO NOT DO THIS! I should have primed where I was overlapping colors. For example, the orange vertical stripe over the green horizontal stripe took me six coats of paint and I STILL feel like you can see the green behind it. After I learned this lesson the hard way, I primed before painting the blue rectangles on each wall and was much happier with how those turned out. Once the final coats of paint were up, I pulled the tape and touched up any areas where there was bleeding or gaps.

It definitely added the young, playful color I wanted in the room while keeping it light and airy.

DIY Built-In Hall Tree
Learn how to create this beautiful, functional, custom hall tree in your space. This is a quick and easy project you can tackle in a day or two for very little money!
Aaahhh built-ins. One of my favorite design elements. A good built-in adds architectural interest, character, and often, storage. They’re customized to perfectly suit the area and functional needs of the space they’re in, making them an ideal solution for small and multi-purpose rooms.
When I moved into this house, I immediately recognized that the store-bought hall tree I had taken with me from my townhome didn’t fit in my new mudroom/laundry room. It was way too deep, given that my washer and dryer were directly across from it. But I needed a place for my family’s many shoes and jackets. What to do? I know! Create a built-in hall tree!
I knew I wanted a bench with shoe storage and originally considered building my own. But then I stumbled across one that perfectly fit the dimensions I needed (when does that happen?!). It even had tall compartments for my tall boots! The only drawback was the color - dark gray. And it had a glossy finish to it.
Undeterred by the color and sheen, I ordered it and drew up a plan for my new built-in hall tree. I always sketch these types of plans before getting started so I can visualize the layout and get an idea of the materials I need. I ended up deviating from this plan slightly (I didin’t continue the molding above the top shelf and changed the placement of the hooks).

Based on my plan, I picked up five 3” x 8’ square molding, one 5” x 8’ square molding, four corbels, and a 15” x 4’ pine board for the upper shelf from my local hardware store. I placed my store-bought shoe bench against the wall where I wanted the hall tree, then cut a piece of square molding the length of the bench. I secured it horizontally at the top of the bench using my brad nailer and 4’ level.
Side note: I, personally, don’t use adhesive when applying moldings like this because someone may want to remove them someday without completely destroying their drywall. I’ve never had any issue with them coming loose. Especially if you angle your nails when driving them in.

I cut the next four pieces of square molding to the height I wanted my hall tree to be. In this case, I opted to match the height of the hall tree to that of my doors (7 feet). The math on that is: 7’ - height of bench - width of horizontal square molding - thickness of top shelf = length of vertical molding. Using my 4’ level, I secured the vertical moldings equidistant from each other using my brad nailer. Next, I secured my corbels to each of those moldings. Then, I installed the pine shelf on top, screwing it into each of the corbels.
Finally, I cut 3 sections each of the 3” and 5” moldings to the width between the vertical moldings. The 5” moldings were installed directly under the top shelf. The 3” moldings were installed halfway between the top and bottom horizontal moldings. After everything was secured, I caulked every seam using a quick-dry, paintable caulk. I primed everything, including the store-bought bench, and then applied two coats of white paint. When everything was dry, I installed the hooks. In this case, I went with silver, to tie in with the other metals in the room.
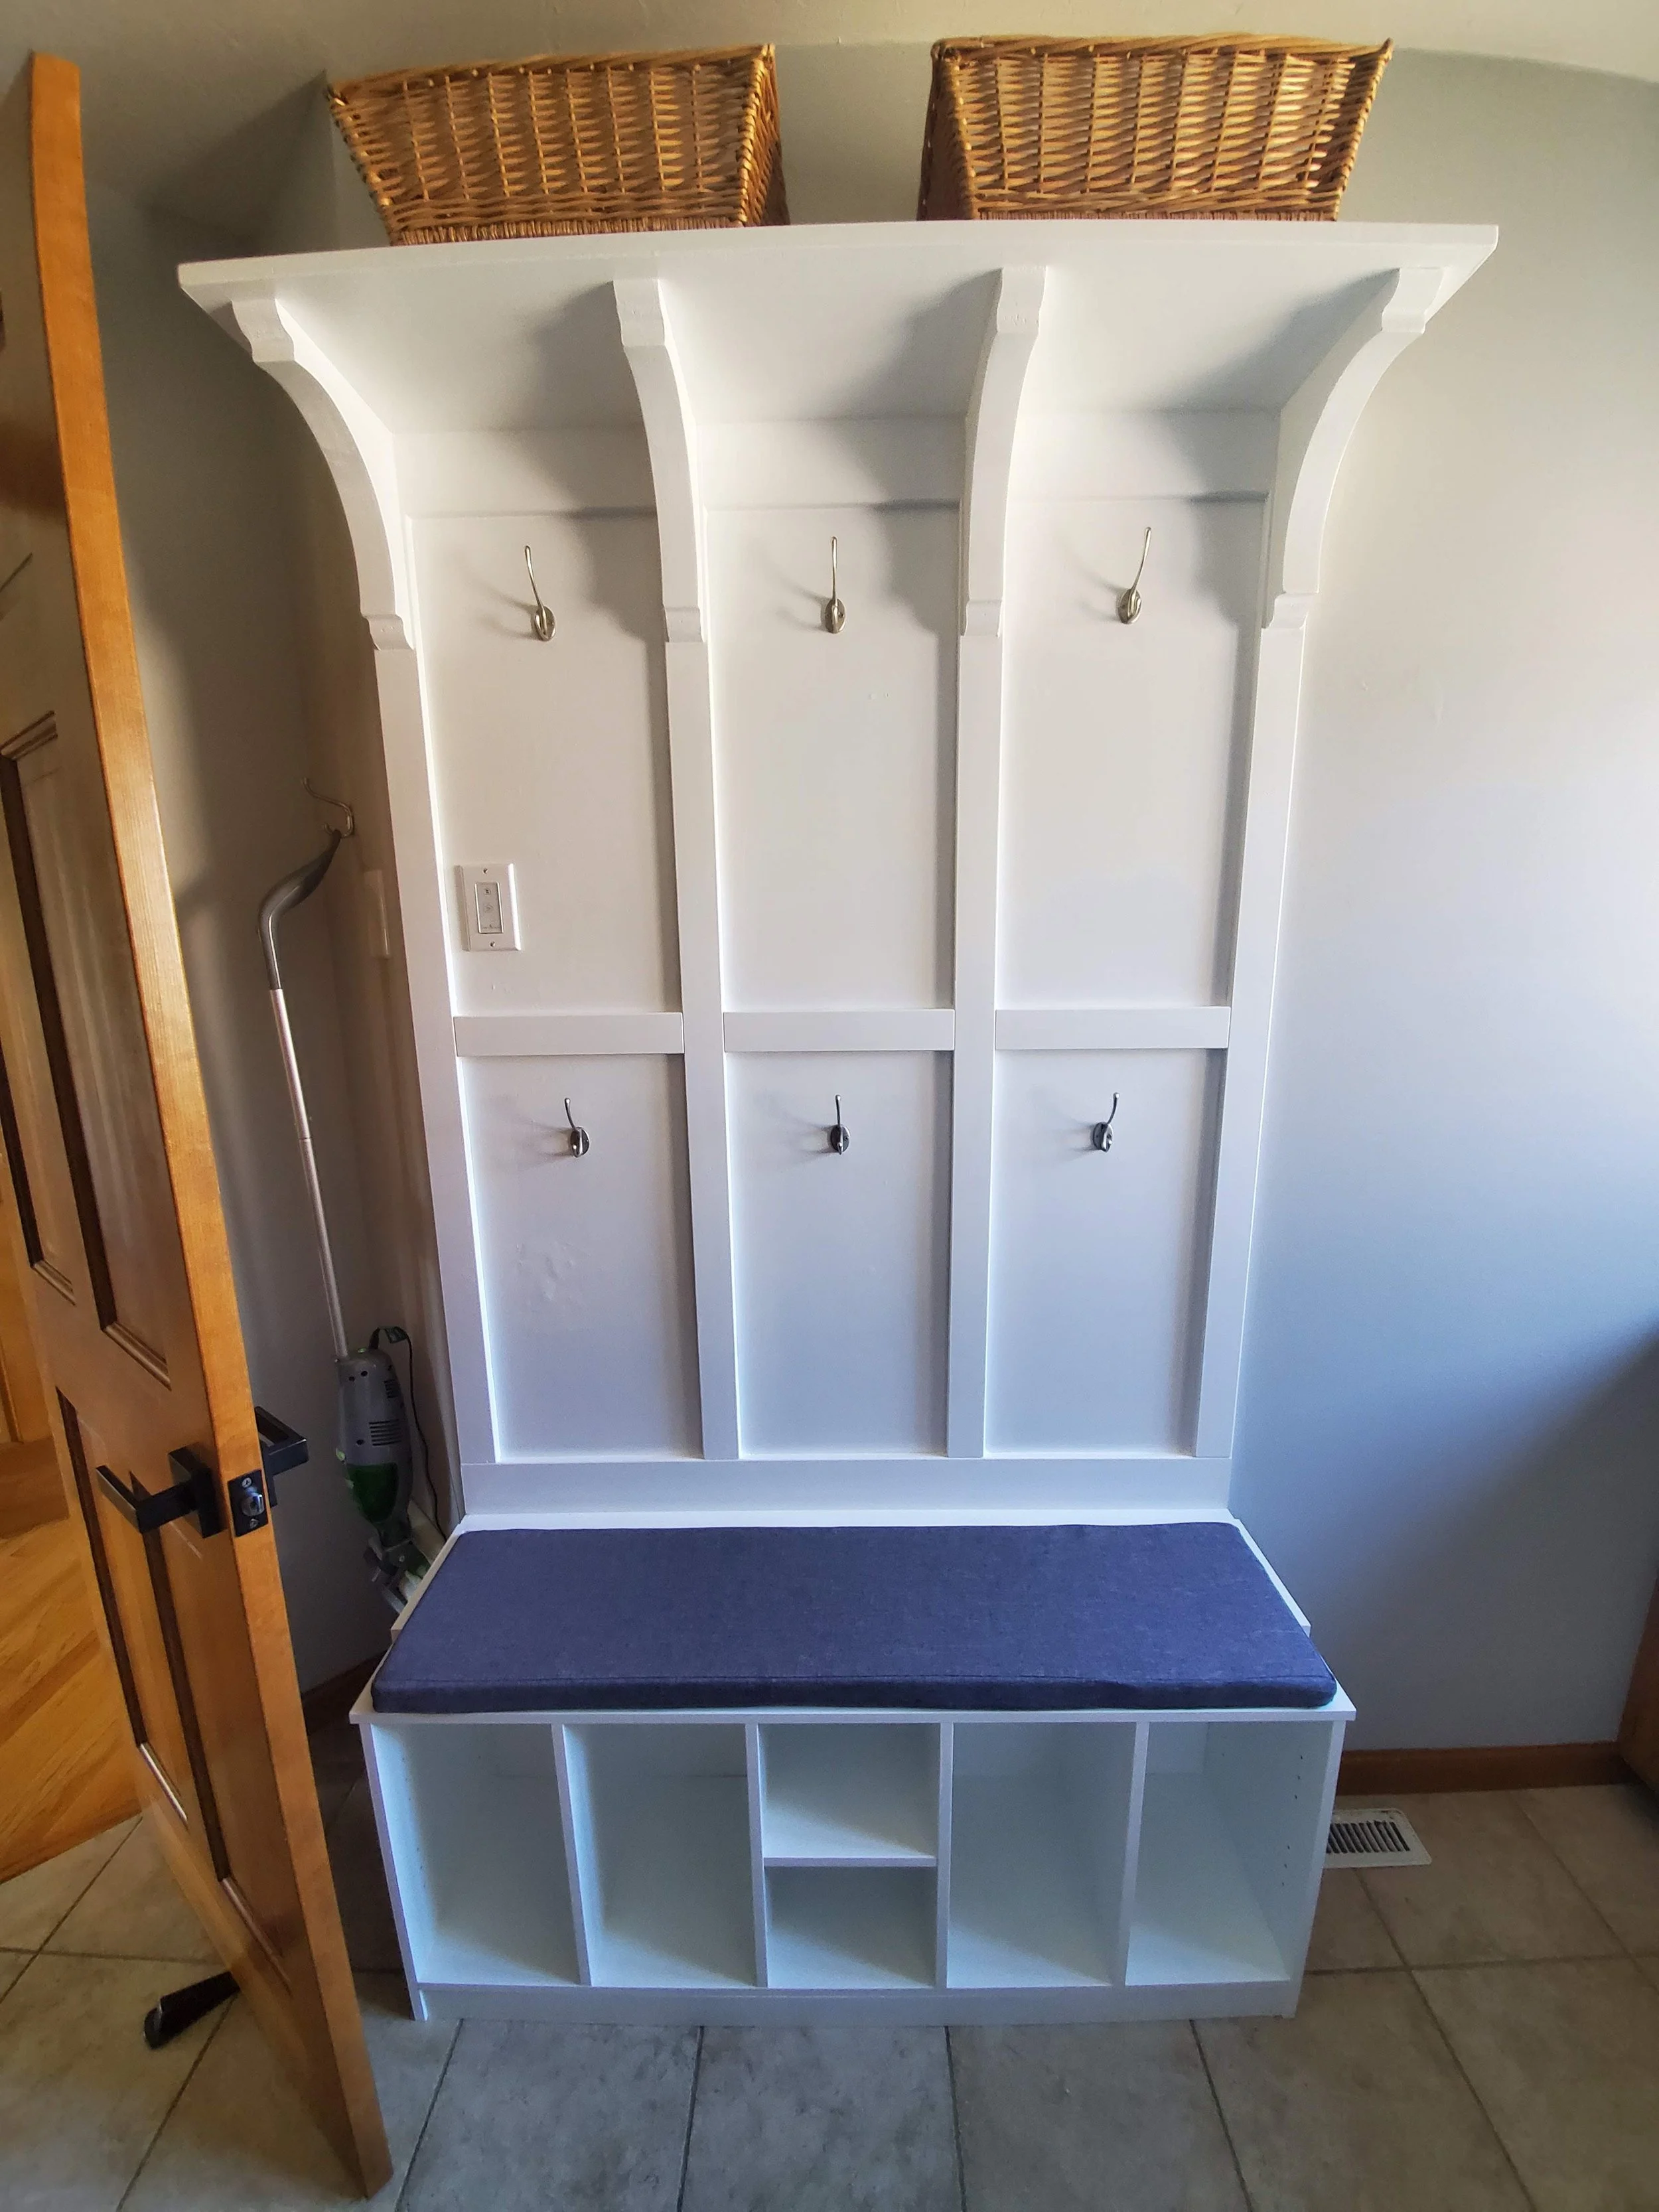
This hall tree stood up very well to heavy, daily use. Yes, the white got occasionally. But I was able to clean it easily and never had an issue with the paint chipping off of the shoe bench, which was a concern because of its original glossy finish. This is a quick and easy project that can be completed over a day or two and will add tons of functionality to your space. Let me know if you’ve tried it and how it turned out!

$30 Thrifted Basket Wall Art
Check out how I created this art installation with $30 worth of thrifted baskets
Like most people, when I moved into this house, it took me a while to get some art on the walls. I was still in the middle of a renovation and those details didn't make it to the top of my to-do list. When I did finally get around to it, I rummaged through the stack of wall decor I had moved from my previous house and found these two mirror and wood pieces. I liked the warm wood color against the white walls and they went well with overall color scheme of the room. They also added a bit of symmetry with the ladder on the other side of the TV credenza. I hung them up and was happy to have something to fill that otherwise empty space.

But the longer I lived with them, the less happy I was with the look. It fell a little flat for me. Everything on the wall was too boxy, the scale was a bit too small, and there was this wide open space above the TV that felt empty. I started seeing these basket wall art installations all over Pinterest and fell in love. The color variation, texture, round shape, and organic, flowing nature of these installations were exactly what I needed to fill this space.
Then, I started looking at where to source the baskets to replicate this look. There are a lot of options, from curated collections (ranging from around $75 to well over $1000), to individual pieces (often priced around $20 - $30 per piece). That was more than I wanted to spend on this project, so I hit my local thrift stores.

I was able to source these 9 baskets from two local thrift stores over the course of two weekends (I had to allow time for new inventory because I cleaned them out each time I visited). The total cost for all 9 pieces was less than $30. And I love the dimension and "collected" look of these thrifted finds.
To hang them, I started with the large pieces, creating the general flow I wanted the overall installation to have. Then I filled in the rest with the smaller pieces and hung them using small nails. For my composition, I tried to avoid having pieces of the same color and size all grouped together. But, you could definitely create an ombre effect, moving from dark to light as you work across the wall.
I'm so happy with how it turned out and even happier with the cost. Try this for yourself and get creative with your materials and composition!

How to Create a Painted “Wallpaper” Accent Wall
Painted “wallpaper” accent wall
I don’t know about you, but I’m ALL about the wallpaper these days. I just love the life, color, and movement they bring to a space. Unfortunately, wallpaper still has a bad connotation with many of the people I talk to. The thought is that it’s expensive, hard to hang, and even harder to remove. Some of this is true. But, wallpaper has come a long way, and should definitely be considered when taking on a new project.
That being said, if you’re still unsure about wallpaper, there are ways to achieve a wallpaper look without the expense and commitment. With some paint, painters tape, time, patience, and math, you can create a colorful accent wall with the look of a beautiful wallpaper. The beauty of this approach is that it’s completely customizable. You can adjust it to suit your space, by playing with the size, shape, colors, and placement.
To complete this project, you’ll need the following:
Different colors of paint (I used white for the background, a lighter greige that I painted the rest of the room, and half pint samples of a darker greige and an orange for the triangles)
Paint brush(s)
Painters tape (1” wide will make the math easier)
Level (4’ or longer is recommended)
Pencil or chalk
Tape measure
To start, you need to determine which wall(s) you want to apply this treatment to. Given the busy nature of the pattern I decided to go with, I chose to only apply it to one wall, the wall you immediately see when entering the room. You might want to apply this to all four walls of your room, on the ceiling, above or below chair or plate rail, or in a niche. Get creative!
Once you’ve identified your wall(s), start by painting the base coat. For this room, I went with a clean white. But you could use any color, as long as your triangles are a contrasting color that will pop against it.
Next, you’ll need to determine the rough size and shape of your triangles. I used painters tape for this, laying out a few different options, standing back, and seeing how they would translate to the entire wall. When I was happy with the basic size and shape, I had to determine how to distribute them across the wall. I opted to adjust the size of the triangles so that they divided equally across my wall. My wall was roughly 10 feet wide. So, factoring in my 1” wide painters tape, I opted to do 17 triangles at 6.25” across which would give me a pretty even distribution across the wall.
If you’re doing multiple walls and can’t find a size that divides equally across all of them, you could lay your first triangle in the center of the wall and work outward. This will center the pattern on the wall but possibly create some cutoff or wrap-around at the ends.
I planned to have an inch of white space on either end of the wall, so I started by laying down a strip of painters tape along the left wall. But, as you can see from my photos, my measurements got off track as I worked my way across and I ended up without space against the right wall. So, word of caution - keep your measurements precise as you work across the wall.
Once my first piece of tape was up, I measured out 6.25” and drew a level line with my 4’ level from ceiling to floor. I then measured out 7.25” from that line (6.25” of triangle + 1” of painters tape) and drew another level line. I continued this way until I reached the right wall. Then I laid down the painters tape to the right of each of these lines.
I didn’t try to equally distribute the triangles vertically on the wall. I was pretty picky about how long I wanted them to be (3”) and wasn’t willing to adjust that. So, I started at the top of the wall, where your eye will naturally go, and ended up with extra space at the bottom, where it wasn’t as noticeable. If you want to distribute these equally vertically, use the same process as we used for the horizontal distribution.
I laid one strip of painters tape along the top of the wall. Then measured down 3” and drew a level horizontal line using my 4’ level. Then I measured down 4” from that line (3” triangle + 1” painters tape) and drew another level line. I continued this down the wall to the floor. Then I laid my painters tape along the bottom of each line.
To make the triangle shape, you need to find the center of each rectangle you’ve created with the painters tape. Since mine were 6.25” wide, my center point was 3 ⅛”. I marked this on each one using my level. Once you have the center marked, you can place painters tape from the upper corner down to the center point on each side to form the triangle.

So many triangles….
Yes, this can be a long, tedious process, depending on the size of your triangles. For me, I turned on my music and enjoyed some “me” time while I knocked this part out.
Now that you have your triangles formed, it’s time for the fun part. What I didn’t do, but wish I had (and would recommend you do), is painting over all of this with your background color. It’ll seal any gaps in your painters tape and prevent the colors from bleeding under the tape and creating a clean-up headache for you. Once your background color is dry, apply your colors to the triangles (you’ll be able to see the painters tape below your paint). I wanted to keep it random, but you could certainly use a pattern. You may need to do two coats.

Once dry, remove the painters tape and clean up any marks left of the wall from drawing the level lines. I used a pencil for my project, which forced me to essentially touch everything up with more white paint. If I did this again, I would use chalk, which wipes away easily. That, or use a Magic Eraser, which is magic when it comes to removing pencil from walls. I also didn’t paint my background color over the painters tape so I had A LOT of bleeding that I had to clean up. Aren’t you glad I made all of these mistakes so you could avoid them? ;-)
I hope you take this tutorial, adjust it for your style and space, and create something you love!